If you want to get things go smoothly during your software development process then this post can be useful for you.
As you know, writing the code is not the main force for a development of delicious software. It sounds quite paradoxical, but the main things are planning and support.
Let me show an example about the planning. A few smart and accurately implemented features can easily overweight the tons of clunky code. The code is nothing by itself. It can be useful only when it flawlessly implements some useful features.
Support allows to achieve bug-free operation of your software. Support makes your customers happy. Support gives you the hints for further project development.
Those approaches require frequent, small, incremental code changes. And your project must be ready for this. You have to go out and prepare three basic aspects:
Automated tests. They allow to be sure about the quality of produced software. Make sure they are easy to launch and then just press the button from time to time; after every bug fix and before each release to the public, as for example
Creation of the final installation package with one or a few button clicks. It makes code changes really cheap and effortless for you. Just fix, build and deliver. Don't think about how the installation must be built every time you need to build it. Let complex things become simple. Just press the button
Publishing and delivery with one or a few button clicks. Ok, installation package is ready, but how are you going to publish? FTP-copy to webserver, fix some HTML, write about some changes, ..., etc. Do not do it like that. Create a single-click solution. Just press the button
So, if you curious about how it's done in Eazfuscator.NET project, let me show.
Testing suite is built with Visual Studio test project. The test project contains a bunch of tests. Every test just references the corresponding .exe file. Every .exe file for every test is created by a separate project, depending on requirements for the test. It may be C# project for .NET, VB.NET project for Compact Framework and so on. Every .exe is launched in a separate AppDomain at the beginning of a test. During .exe execution its stdout output is grabbed and recorded to the memory. After that, the .exe file is processed with Eazfuscator.NET obfuscator. Then it launched again in a new AppDomain and its output is then grabbed and compared to the original output of non-obfuscated .exe. If the outputs differ, then “Ooops, something went wrong” and test fails.
The test suite works really great being dumb and simple. Screenshot of the window with the tests being executed after some small bug fix today:
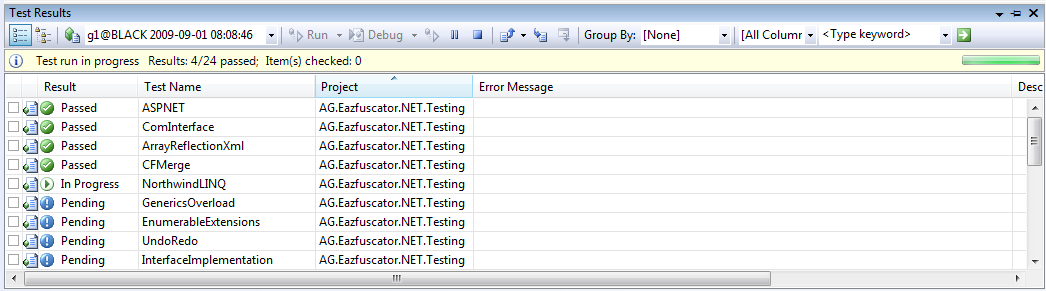
And then, bingo!, code changes are ok, everything works as expected:

Installation builds and publishing are controlled by a tool called “Eazfuscator.NET Production Board”. Actually I've created it in a form of a kit and it can be attached and customized to any project within a minute. Screenshot:
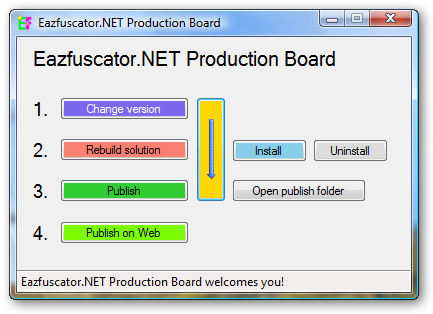
Buttons for the most frequent operations are color-marked for a greater associativity and scan-ability by the eye; it speedups the game. The tool allows to orchestrate the whole manufacturing process of your product within several button clicks. Simple and dumb at the face, but super smart behind the scene. The real time saver.
Production Board in Details
Production Board does several important things. First of all, it allows you to modify the version information for a product. It can be done by pressing “Change version” button:
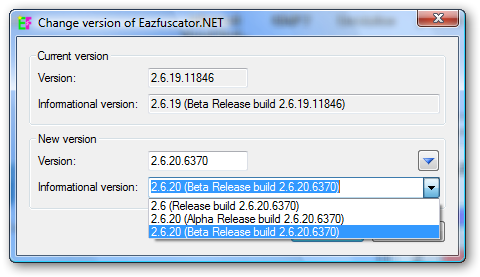
As you can see, you are informed about the current version and you can define the new one. By default, the dialog just increments the build number of a version and generates the new revision number based on the current time, so it gives the new version for a product. It can be overridden by the user if necessary. Also it's possible to select several predefined version descriptions from a drop-down list, such as Release and Beta.
When the user presses OK button, the new version is delivered to the project files. Behind-the-scenes magic begins right here. There are several places in the project to put the new version in. Obviously, AssemblyInfo.* files are patched to correspond to the new version. Installation project file (.vdproj) is also patched to define the new version for an installation package. The new GUID for installation UpgradeCode is automatically generated too. Changelog XML file is patched to include the latest version number and a fresh time stamp. And the last patched place is an update manifest file which allows customers to potentially receive an update for that new version through the Internet.
“Rebuild solution” button just rebuilds the code base and installation package by invoking corresponding tools. For Eazfuscator.NET, the windowless Visual Studio instance is created with COM automation interface. That instance builds the code and installation package.
“Publish” button gathers and delivers product output files to the predefined folder on the file system. During this step the file name for an installation package is renamed to eye-candy name which includes the current product name and version: setup.msi becomes Eazfuscator.NET 2.6.20 Beta Setup.msi.
After the publish step, the product can be played and tested at the local machine. That's why there are “Install”, “Uninstall” and “Open publish folder” buttons. If the product passes the last manual test(s) then it can be published on the web.
“Publish on Web” button copies files to the web-server via secured FTP channel. These files are placed at the special locations on the web-server, so the web site application catches them and generates the new content about the new available version.
Change version, rebuild solution and publish are common actions being executed one-by-one at most of the times. So that's why there is a yellow button with a long arrow on the dialog. This button aggregates those three frequent actions in one click.